

The Best Skoolie Floor Plan
Deciding on What Your Skoolie Floor Plan Is Going To Look Like
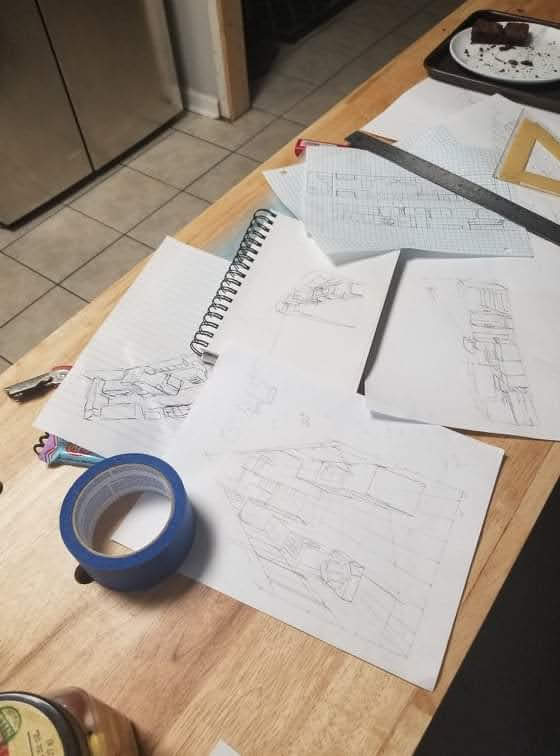
Trying to imagine what your skoolie floor plan is going to look like when it is all finished is how most of us spend our time when we aren’t actually building the bus. Deciding on the perfect skoolie floor plan is what keeps us up at night when we are trying to go to sleep.
Do we put the couch on the left or right side of the bus? Do we build a 5-foot kitchen counter or a 7-foot countertop? Should the bathroom go in the rear of the bus or the middle of the bus? Can we fit a king-sized bed in our build?
The questions and decisions are almost limitless.

Laying out the perfect skoolie floor plan is what most of us believe is the most important part of your conversion. It is after all going to be your home while you are traveling in your tiny house on wheels.
What Goes Into A Skoolie Floor Plan?
Deciding on what your skoolie floor plan is going to look like takes some considerable planning. Think about it, after all, this is going to be your home. Whether you will be traveling full-time or part-time, this is going to be where you will spend a significant amount of time.
It’s not like your living room or bedroom in a house or apartment where you can simply rearrange the furniture every now and then. Your skoolie floor plan is pretty much going to be it for as long as you have the bus.
You are going to want your floor plan to be functional, comfortable, and have a good feng shui to it.
Every home, whether it is a “sticks and bricks” home or a tiny home on wheels, has some basic needs.
Building these specific criteria into your skoolie floor plan will make your life on your bus much simpler and more enjoyable.
Here are our 5 basic needs for every home.
- A place for lounging and relaxation
- A Place to prepare food and Eat
- A Place to Sleep
- A place to Poop
- A place for Your Stuff
Now, let’s take a little deeper look at what items make up each of these areas of your skoolie floor plan.

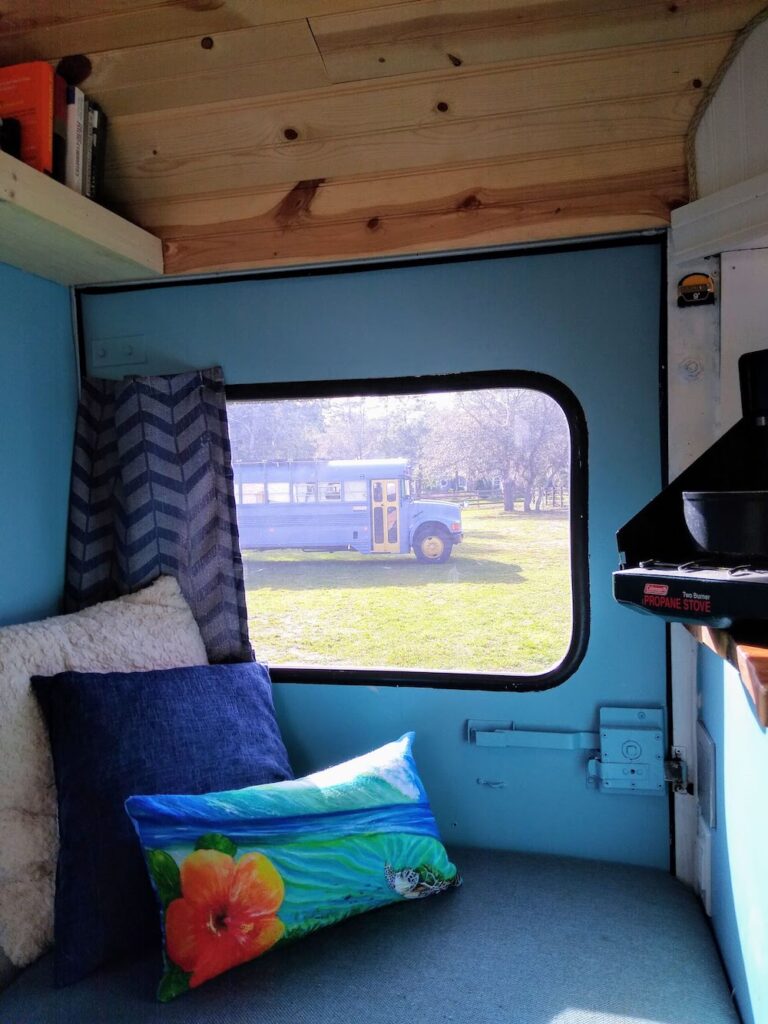
Living Area
The living area of your skoolie is going to be where you spend a majority of your free time when you are not sleeping.
If you are anything like us, we tend to spend a majority of our time just outside of our skoolie when we are not sleeping.
However, when it is cold or too hot and when the weather just isn’t cooperating like snowing or raining, you are going to be inside of your skoolie.
While you are on the inside, you want to create a floor plan that is both functional as well as comfortable while lounging about.
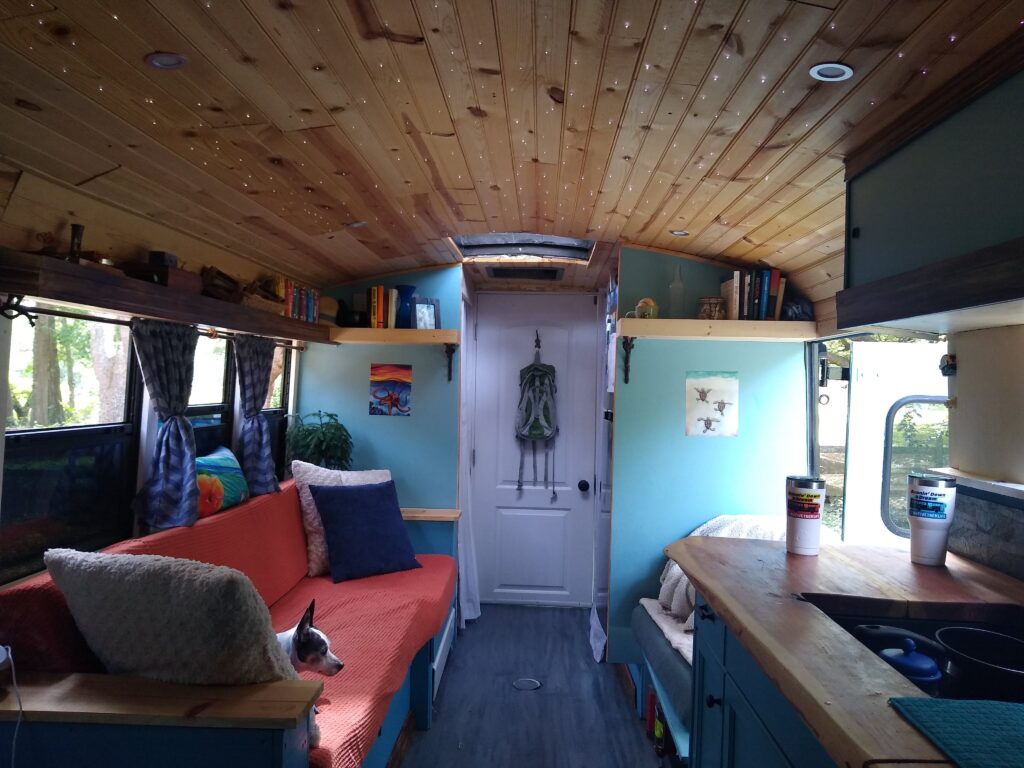
Most skoolies we have been in, including ours, have a sofa. Whether you build the sofa yourself or you have a manufactured sofa/couch in your skoolie, this is the “go-to” spot when you are not in bed.
Be sure to position your sofa so you can interact with whoever else is inside of your skoolie without straining your neck to see them.
Also, if you are going to have a television for movies or gaming, plan your skoolie floor plan so you can easily and comfortably see the screen.
The living and lounge area may also incorporate the driver or passenger seat of your skoolie with a full swivel seat base so those seats can also be incorporated into the living area as well.
Swivel seats for the driver and passenger seats are typically more common in van build conversions, but we are doing a swivel seat for our passenger seat so that it becomes a part of our living area.
Kitchen
The kitchen is the heart of every home. It doesn’t matter if you are in a log cabin, a condo or apartment, or a skoolie, the kitchen is the center point of all activity.
Even if you do not like to cook very much, the kitchen is still the area of your skoolie floor plan where people tend to gather. It can be used for so much more than just preparing your meals.
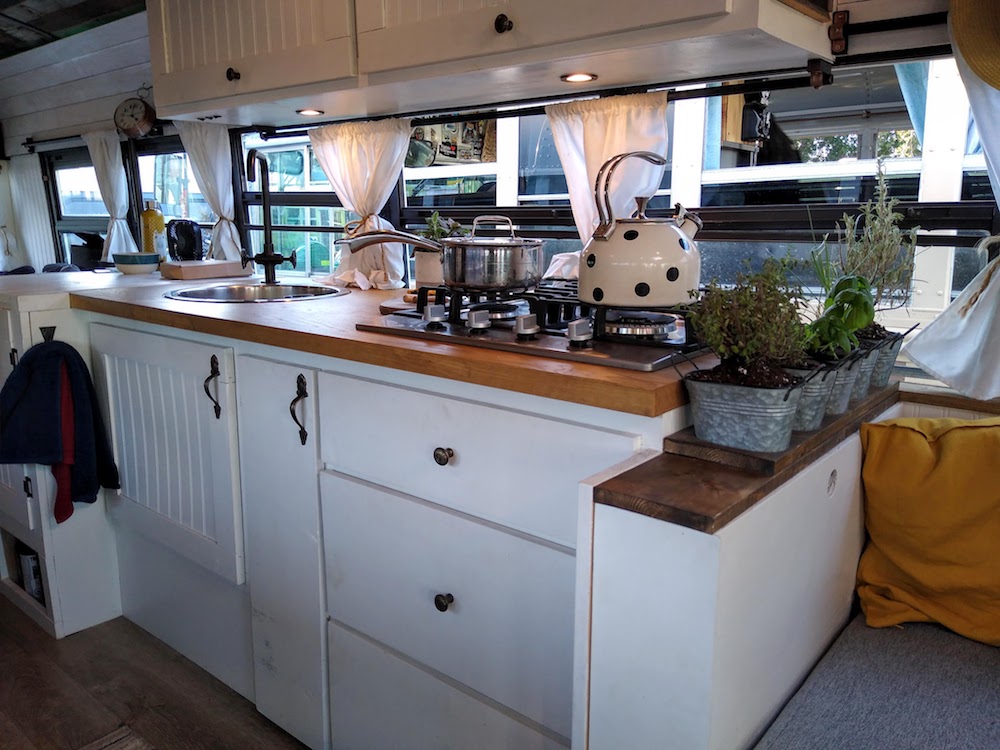
The kitchen counter typically doubles or triples as a workstation for your computer and a counter or tabletop for crafts and projects.
Remember, you are living in less than 250 square feet. It is advisable to plan your floor plan so that you can use areas of your skoolie for multiple functions.
Another important thing to consider when planning your kitchen in your skoolie floor plan is which side of the bus you want your plumbing as well as propane lines to run.
Having your plumbing and propane on one side of the bus is definitely recommended.
Bedroom
The bedroom is where you are going to be spending at least a third of your time. Assuming that is that you get at least 8 hours of sleep each day.
Aside from sleeping, the bedroom is the ideal place to spend some, well, “quality time” with your significant other as well as the “go-to” spot in your skoolie when you are tired or not feeling well during the day.
The bedroom in your skoolie, more times than not, is also the preferred location for watching movies.
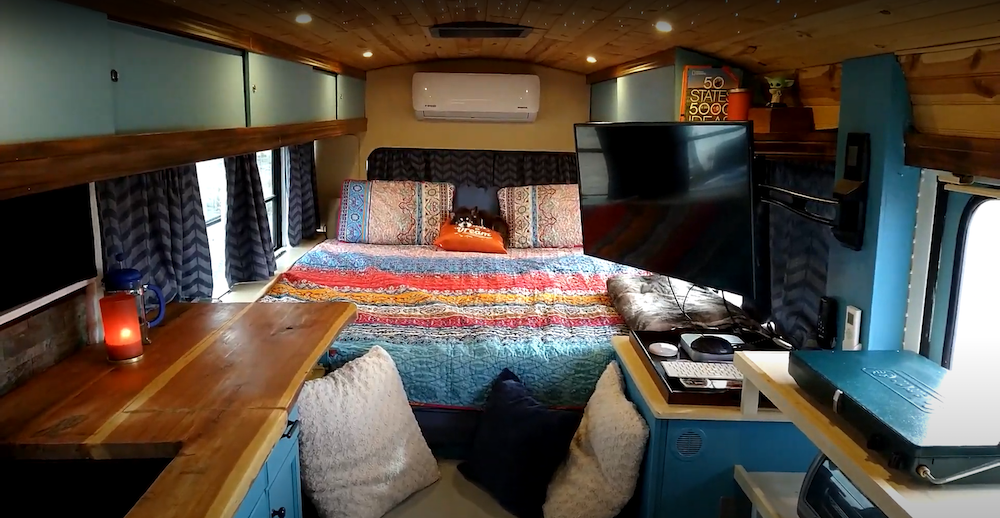
Are you planning on sleeping side to side or front to back in your skoolie? This may seem trivial, but it is a big deal when boondocking or camping in campgrounds and dispersed land that is not exactly level and even.
Is it easier to level your bus front to back or side to side? Depending on how you have your bed situated in your skoolie floor plan may determine how comfortably you sleep.
Bunk Beds
Is it just you and your significant other or the occasional sleepover guest that will be sleeping in your skoolie or will you have children, family members, or bus-mates?
Having other sleeping arrangements in your skoolie is a high priority when planning out your floor plan.
If you are planning on having separate sleeping arrangements, a very popular option is to make bunk beds or a side bunk if there is only one bed needed.
Another great idea is to convert your sofa into a bed. It is a very simple design to pay your couch down flat into a twin or a full-size bed.
You would need to fold the bed or “make it up” in the morning to allow room for you or others to walk through the walkway.
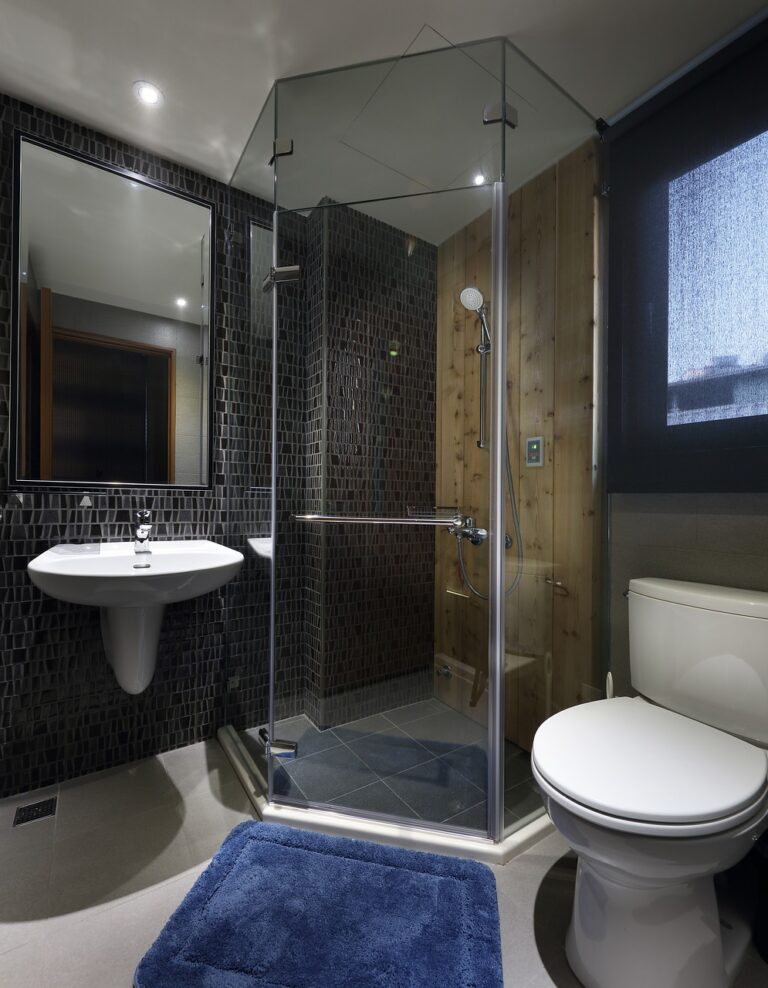
Bathroom
The bathroom is that white elephant in the room no one ever really wants to talk about it seems. When really, this is probably the most important aspect of your skoolie floor plan there is.
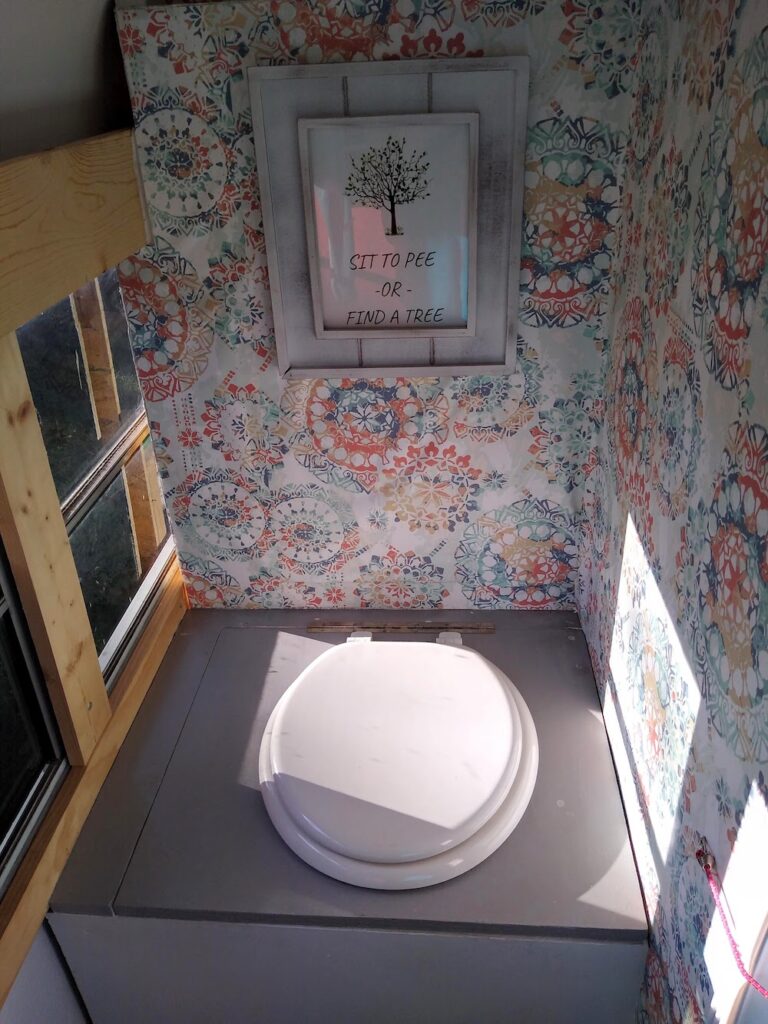
Have you ever been somewhere, maybe it was in your skoolie before you had a functioning toilet and needed to go potty, but couldn’t? Not that you physically couldn’t, just that there was nowhere to go do the business you needed to do.
If so, then you understand the value and importance of having a safe and comfortable place to do the doo.
It doesn’t matter if your skoolie bathroom is large or small. It doesn’t matter if it is by your bed or near the front of the skoolie entrance. What matters is that you incorporate your bathroom into your floor plan in such a way that it makes sense for you.
We are not going to go into detail about whether you should do a composting toilet or a cassette toilet. Whether you do a black tank or you bag your poop, that is your business and this blog is simply about where you physically build the bathroom into your floor plan.
Toilet
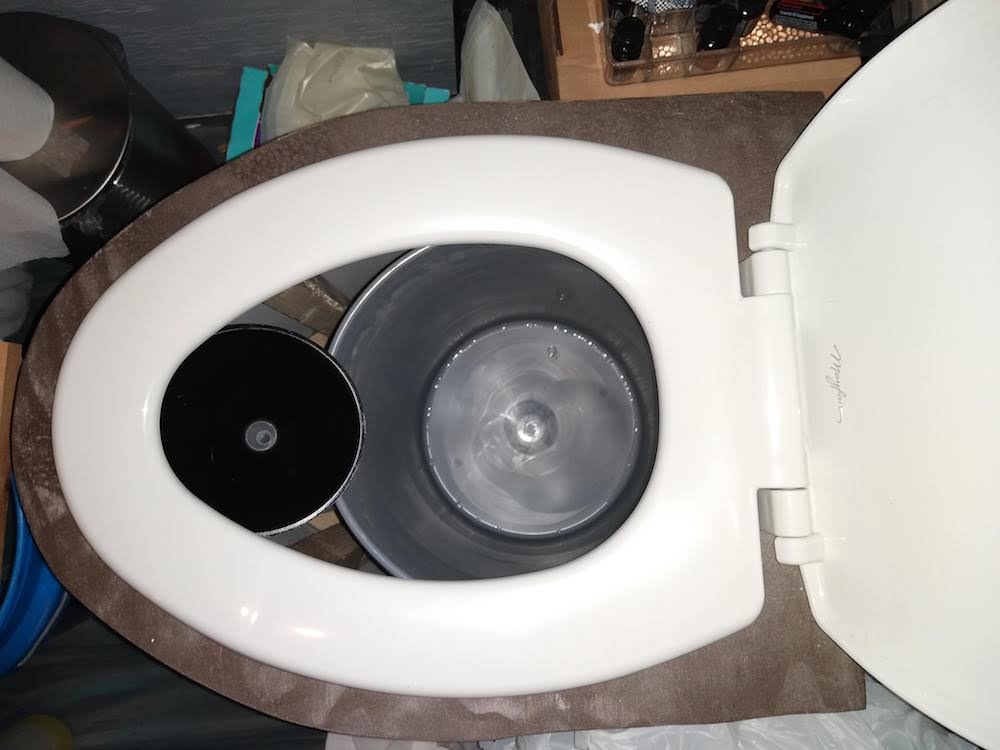
One of the most ingenious toilets we have seen in a skoolie build was done by Escobond on the Road skoolie. Chelle and Griselda built their toilet into a box, or coffee table, type of structure.
When they wanted to use the toilet, they lifted the lid, opened the little door, and, voila!
There is their toilet in all of its glory hidden from the world, but discreet and easily accessible no matter when they need it.
Perhaps, you want a dedicated room for your throne. If you have the space in your floor plan, then all of the power to you to make an actual bathroom.
Another popular placement for the toilet we have seen is in the actual shower itself. Depending on the type of toilet you plan on using, the toilet can remain in the shower or you can simply remove it from the shower pan while you take a shower.
Shower
One of the mistakes people regret making so often is that the shower is a room all by itself. Typically 28” to 32” inches of floor space with walls dedicated to taking a shower. Most of the time, this shower room is used for storage.
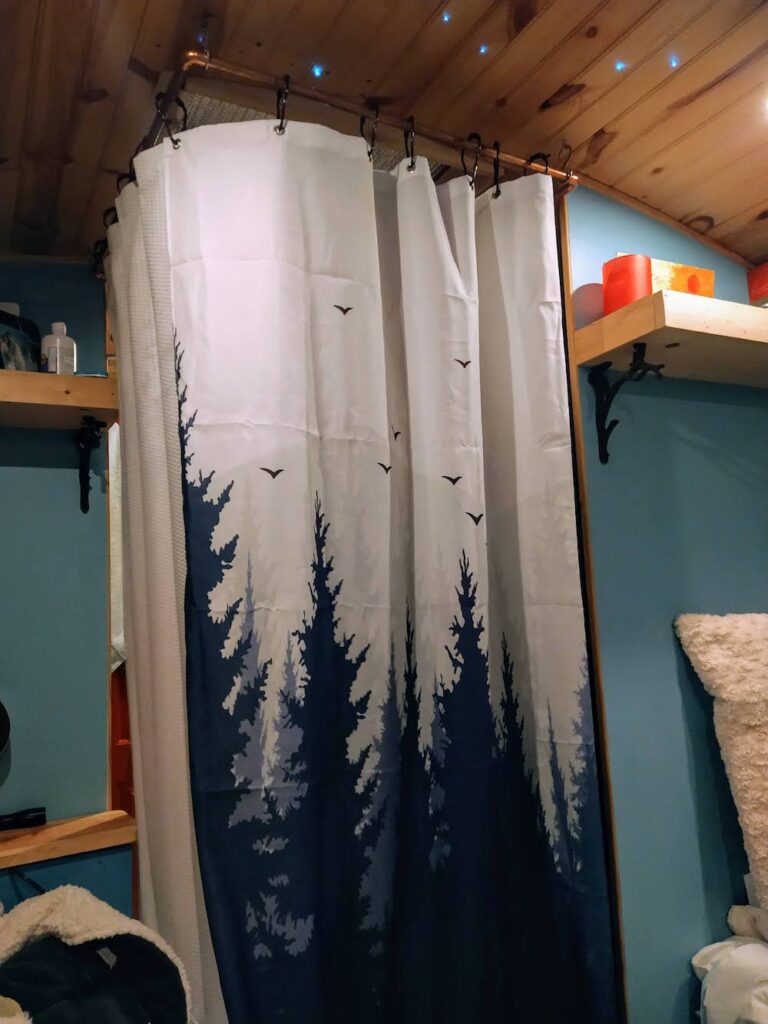
The shower in a skoolie is not typically used as a shower in your house or apartment. We skoolie owners and travelers are usually a little more conservative with our water usage.
It’s okay if that is what you are planning on doing, but more people we have spoken to than not wish they would have used the shower stall space in a more efficient manner.
Think Outside The Box
In our first skoolie build, our shower was built right underneath a part of our sofa. We had a 32” x 32” shower pan on rollers. We would roll it out into the middle of the floor where we had installed a marine capped drain. It was flush when not in use.
The shower pan would roll over the drain and then the shower curtain would be attached to copper tubing on the ceiling. When we were done with the shower, we simply dried it out with a chamois cloth and rolled it back under the couch.
This design in our floorplan saved us over 10 feet of square footage for our skoolie.

We have not seen a skoolie shower with this design yet.
Our current shower in our new skoolie build is a box type of shower like our toilet. Our toilet sits in the box, covered when not in use. When we want to use the shower, we just move our toilet to a different area and hang the shower curtains on magnet hooks attached to the ceiling.
We take our shower, dry the shower pan with a chamois cloth and then put the toilet back on the shower pan and close the box lid.
Just like that, our bathroom has been transformed into a coffee table again.
Cab
The cab to your skoolie is probably one of the most overlooked and underappreciated areas of your skoolie floor plan.
There are several different options when incorporating the cab area into your skoolie floor plan. Don’t just write it off as the place where you drive and enter the bus. There are some pretty cool floorplan options for this area of your skoolie.
There are plenty of storage space available, different entry, security, and energy-saving ideas to incorporate.
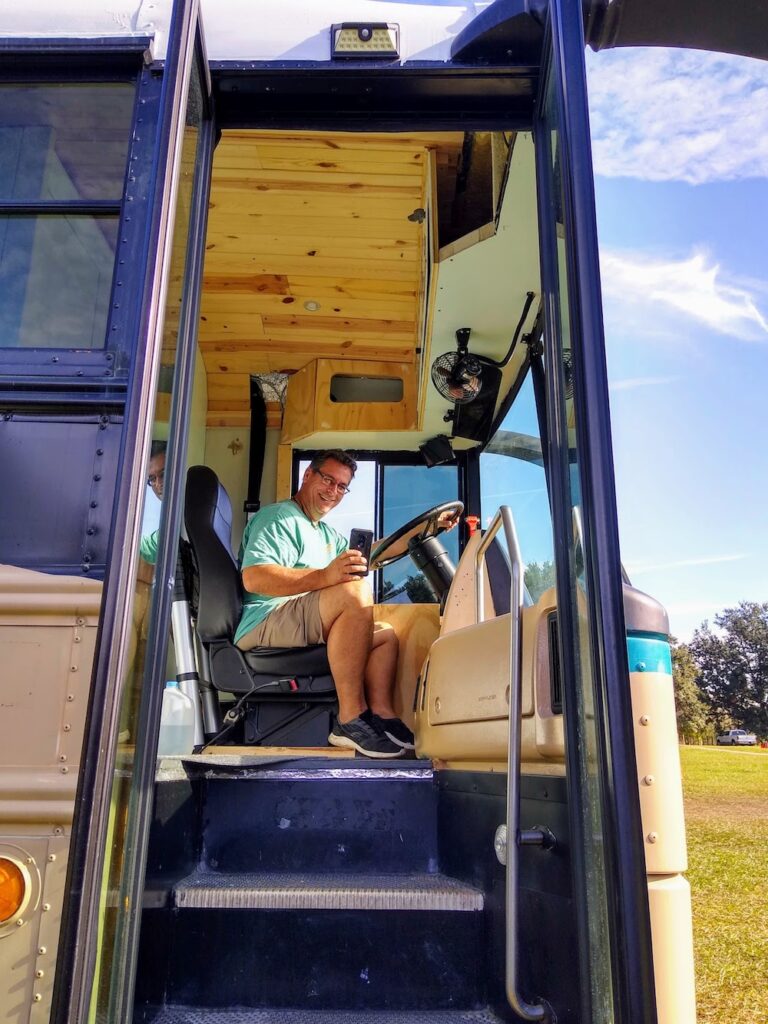
Stay tuned for a video on what we are doing to the cab area of our current build. We are moving the entry door back to where the first window on the right side is located.
We will then move that first window to where the entry doors were located. Put in a passenger seat so the driver and passenger can then ride side by side and have a conversation while traveling.
The entry door will be replaced with an RV-style door and the entry steps will fold down.
Garage
Another very popular area of your skoolie floor plan is the garage. Call it what you may, but it is the area of your skoolie where you keep things you would traditionally keep in your garage in a home.
For the conventional dog-nose skoolie or the front engine flat nose skoolie, there is always an area at the rear of the bus with an emergency exit door. This makes for a natural area to store things like bikes, hiking gear, tools, and things, well, you would keep in your garage.
For a rear-engine skoolie, also known as a diesel pusher, this area of the skoolie is not available for a garage. You will either have to store items you would keep in your “garage” in another area of your skoolie, or you could utilize some underbelly storage.
Interior Garage
The interior of your skoolie is certainly a safe and secure place to keep things you want to regularly access for outdoor activities and living.
Those items would include things like campfire chairs, any kind of outdoor equipment, tents, awning tarps, or anything else to help make the outside of your skoolie more comfortable and relaxing.
Remember though, any floor space used for your garage is going to take away from your living space on your floor plan.
If you aren’t planning on keeping things like bicycles, lots of tools or outdoor equipment, the interior rear garage area of your skoolie may be an ideal space for your freshwater tank, solar equipment, and or solar batteries.
Be creative and do not feel married, constrained, or obligated to design your skoolie floor plan like everyone else. Just because a lot of people use the back of their bus for the garage type of stuff, doesn’t mean “that is the way to do it”.
You be you and design your skoolie floor plan how you want it and how it fits and works best for you!
Under Belly Garage
If you are rocking the diesel pusher, then you are going to have a lot of space between your two axles. It doesn’t matter if you have a long or a short wheelbase. Just about all of that space between the wheels are just waiting to be converted into underbelly storage.

Now, just because all of that space is available, doesn’t mean you have to utilize it just so you can carry “more stuff”.
George Carlin summed it perfectly when referring to “our stuff” and accumulating “more stuff”.

So, just because you have room for it in your skoolie, doesn’t mean you have to fit it all in and use every cubic inch of space possible.
Remember, you are choosing to live a minimalist lifestyle. We know that means different things to different people. Just remind yourself every now and then that you do not have to have everything on your bus.
The more light we have traveled, the better we have felt.
Skoolie Floor Plans – Do Not Overlook These Items
When you design your skoolie floor plan, do not make the mistakes that many people make when considering these often overlooked items. It’s easy to manage a place for the big items like your bed, bathroom, sofa, and kitchen counter.
When planning for these items, however, it would be wise to remember the little things. It is often the little things in your skoolie floor plan that make living in a skoolie truly a wonderful and magical experience.
Let’s look at a few of these often overlooked areas and items for your skoolie floor plan.
Trash Can
That is one of the areas of our first skoolie floor plan we did not account for. We ended up using grocery store plastic trash bags as our trash can. It worked, for the most part for us, but we just ended up having a lot of small trash bags until we could get to a place to throw them away.
In our current skoolie build, we are incorporating our trash can into the kitchen counter on a slider. Also built into the kitchen counter will be a butcher block cutting board with a hole in the middle that will be directly above the trash can.
Laundry
Where do you plan on putting your dirty, smelly laundry? I know! We didn’t really think about that either! However, we are going to have a specific and discreet spot for our dirty laundry built into our current floorplan.
It’s one of those parts of skoolie life you don’t normally think about until you are forced to think about it.
Shoe Storage
This is another part of our initial skoolie floor plan that was non-existent on our first build. It really can become a mess if you do not have a designated place for your shoes, flip-flops, boots, or whatever kind of shoes you may happen to need on any of your adventures.
Tools
I know we have mentioned that your skoolie garage is an ideal place to keep any tools you may decide to carry with you on your skoolie travels, but what about everyday tools you may want easy and quick access to.
We are talking about the cordless electric screwdriver. Maybe a screwdriver or pair of pliers. Having a specific spot for these types of tools will make your skoolie life much more convenient and hassle-free.
Pantry
No, we didn’t forget to plan for a place to keep our food, but, we didn’t exactly plan it out that well either.
We had a place for our food, but it wasn’t the most user-friendly pantry. It was an upper cabinet that was pretty deep as much as it was dark. We had to move three things to get to one. It was effective for holding our food and consumables, but it wasn’t very well thought out.
Planning a pantry into your skoolie floor plan that is both easy to access as well as easy to load and see will make preparing meals and getting to your snacks much easier.
Electrical Panel
Your electrical panel is not just a part of your solar or electrical grid on your skoolie. Your electrical or fuse panel is an area of your skoolie you are going to want to plan into your skoolie floor plan that is easily accessed as well as kept safe and secure from other items nearby.
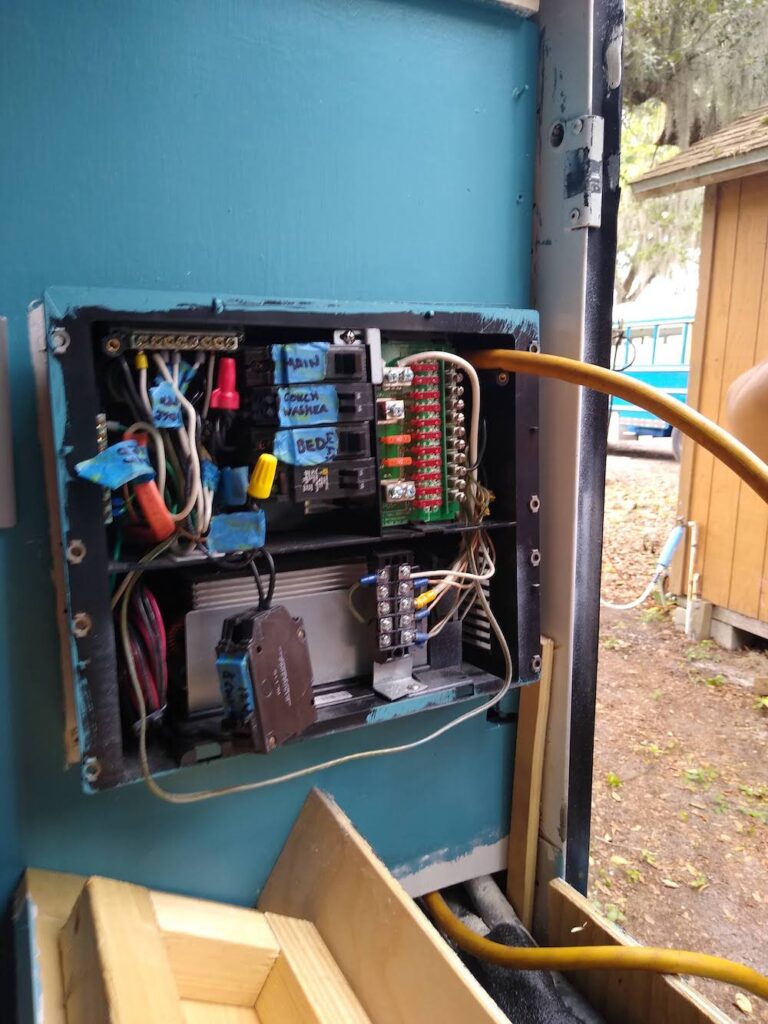
In other words, it would not be a wise decision to put your fuse panel or electrical panel in a cabinet where you keep things like clothes, linens or paper products.
Hot Water Heater
Now, let’s talk about how you plan on heating your water. If in fact, you are planning on heating your water.
Basically, you have a few choices when it comes to hot water. We are not going to talk about the advantages or disadvantages of each of these ways to heat your water. We are only wanting to focus on where to place your hot water heater as it relates to your skoolie floor plan.

Instant Hot Water Heater
Instant hot water heaters, whether they are propane or electric, take up very little space. The propane hot water heater, however, must be placed in a location where it neither becomes a fire hazard nor an exhaust issue.
Ventless Instant Hot Water Heater
The ventless hot water heater is what we used in our Sprinter van conversion as well as our current skoolie conversion. We are sold on the ventless propane instant hot water heater. You can keep it inside of your conversion and it is a low-profile water heater that delivers when called upon.
Electric Hot Water Heater
We used a 2.5-gallon electric hot water heater in our first skoolie build. We hadn’t accounted for it when we were designing our skoolie floor plan, so luckily, it ended up fitting underneath our kitsch counter by the sink.

Electric water heaters with a tank that holds water can be large, bulky, and take up a good bit of room. On top of that, if you are using solar and batteries for your electricity, they also take up a lot of juice from your batteries. So, with that said, plan accordingly.
Solar Hot Water Heater
If you are really looking to save on power space and money, then a solar hot water heater may be a good option for you. The solar hot water heater is a black tank or bag that you set outside of your skoolie on warm sunny days.
The sun heats up the water inside of your container and then you use a gravity, foot pump, or battery-operated pump to force the water through your shower head or house.
The negative thing about the solar water heater as it relates to your skoolie floor plan is that you have to plan and account for a place to store your water tank as well as some kind of portable shower stall to give you privacy for your showers.
How Much Square Footage Will I Have To Build?
Just because you have a 40-foot bus, doesn’t mean you are going to have 40 feet to build your ultimate skoolie floor plan.
If you have a flat nose diesel pusher skoolie, you are going to have more interior floor space than if you have a 40-foot dog nose skoolie.
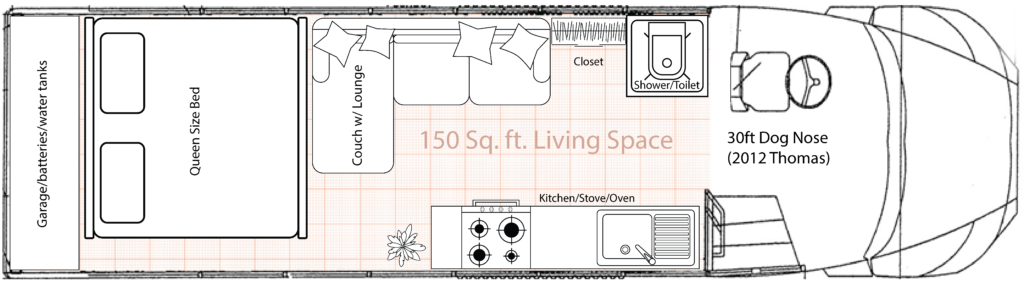
The table below is based on a Thomas dog-nose skoolie. These numbers will give you an approximate but fairly accurate idea of how much square footage you can plan for your skoolie floor plan.
| BUS DESCRIPTION | LENGTH * | WIDTH | SQUARE FEET | |
| 5 Window | 15 | 7.5′ | 131 | |
| 7 Window | 20′ | 7.5′ | 150 | |
| 11 Window | 30′ | 7.5′ | 225 | |
| 13 Window | 35′ | 7.5′ | 262.5 |
* Interior build space. Measured from behind the driver seat to the back wall based on a dog-nose skoolie.
If you still aren't quite sure what skoolie is the best for you, read this post about Choosing The Right Skoolie For You.
Interior Measurements
When planning out your floor plan, it is helpful to know the interior dimensions and measurements. You need to know the dimensions of your wheel wells to accurately determine the location and size of your sofa, kitchen counter, or where you are going to place your freshwater tank.
How high are your countertops going to be? How tall and where are you going to place cabinets such as a pantry, bathroom, or shower wall?
Below are some measurements we took from our 2004 Thomas HDX Saf T Liner as well as our 2006 Thomas C2 Saf T Liner.
- Front door width – 29” door with 27” opening
- Interior – floor to the bottom of window sill: 30.5″
- Interior – floor to top of the ceiling: 77.6” (Most skoolies are 72″ to 78″ without a roof raise)
- Window width – Regular windows are 25″ wide, Long windows are 32″ and 35″
- Window height – 24″
- Window sill height – 30.5″
- Distance between wheel wells – varies based on model
- The average size of wheel wells – 48″ in the front and 39″ in the back.
Your Skoolie Floor Plan for Your Lifestyle
Think for a moment about how you want to travel. What does the typical day look like for you while you are boondocking on some BLM or dispersed camping land?
Will you spend more time inside of your bus gaming, working, watching movies or will you be more active hiking, cycling or just lounging in a hammock between two pines?
How you plan on living your ultimate skoolie life should reflect on what your skoolie floor plan looks like.
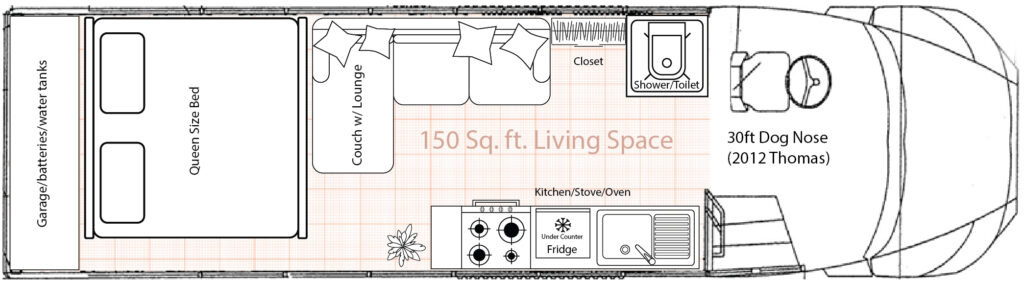
Our Favorite Skoolie Floor Plans
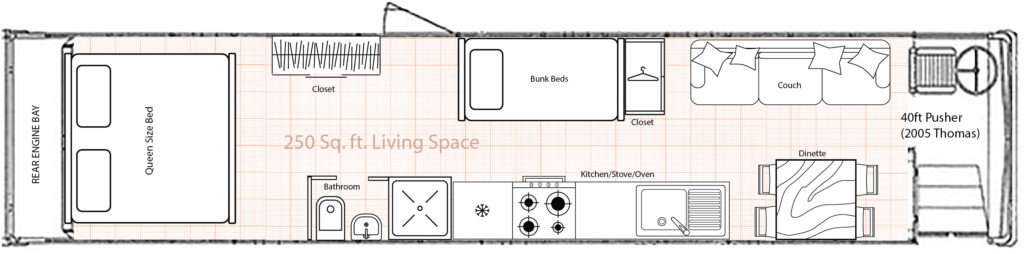
We have built our own skoolie from tear-out to completion on our 32 foot Thomas diesel pusher. We had 25 feet from the back of the driver seat to the rear engine cover. That gave us a total of 187.5 total square footage to build on.
We did have to compensate for the right side 48” wheelchair lift and the left side 30” emergency door. We sought out that bus specifically though.
Our skoolie floor plan was built around those left and right side doors. We loved it and made it work for us!
Our current build is a dog nose that has a total of 20.5 feet from behind the driver seat to the back door. This gives us a total of 154 square feet to build on. Our skoolie floor plan for this build will be quite different from our first conversion.
Most skoolie floor plans have countertops and sofas on either side of the bus with an aisle going right down the middle of the bus. This is how we built our first bus.
For our current build, we are doing a staggered aisle. Our sofa is going to be a sectional or “L” shaped sofa and our walk-through aisle will be off-center for part of the floor plan.
We like this change as it breaks up the lines and monotony of the floor plan. For us, the feng shui works for our energy.
Now, let’s take a look at some skoolie floor plan alternatives depending on the size of the bus.
Skoolie Floor Plans Samples
Depending on the style and interior dimensions of your bus, your schoolies’ floor plan will have a certain amount of flexibility as to what you can do with it. It may not seem like a big difference, but having a traditional dog nose skoolie as opposed to a flat nose can make a big difference on your skoolie floor plan layout.
Even more surprisingly, a flat nose diesel pusher will have a different floor plan footprint than a flat nose front engine. The entry and engine cover of the front end changes things up slightly for the front end of your skoolie floor plan.
Let’s take a look at a few floor plans for the different sizes and styles of the most common skoolies.
Midsize Skoolie Floor Plans
Rear Engine Skoolie Floor Plans
Dognose Skoolie Floor Plans
Shuttle or Short Skoolie Floor Plans
Skoolie Floor Plans – Q & A
There are a ton of questions you likely have about your skoolie build and skoolie floor plan. In fact, if you are like most of us who have taken on this amazing project of creating a tiny house on wheels, you probably have more questions than answers.
The great thing about the skoolie community is that there are so many people who have the same questions as you and so many people who have already come up with those same answers.
We love the willingness of the skoolie owners and community who offer their experiences, knowledge and help to those who haven’t figured out the answers yet.
Below are some common questions we get from others. If you have a question we have not answered here, we would love for you to leave a comment at the end of this blog so we can get you answers.
What Skoolie Floor Plan Is The Best?
The very best skoolie floor plan we have ever seen or even heard of is the floor plan that meets the individual’s or family’s needs for that particular skoolie.
We are not trying to sound so diplomatic, but are making a point here.
What we like may not be what you like. So, giving an opinion of what skoolie floor plan is the best is as irrelevant as telling what exterior color of a skoolie is best.
There is no one true best skoolie floor plan. We all have our preferences and possibly even our favorite, but it all depends on the bus, the needs of the individual or family, and what your plans for your skoolie are.
Our first skoolie floor plan is very different from our current skoolie floor plan.
We have different needs and wants for our current skoolie than we did for our first skoolie.
We always go back to our thoughts that one of the greatest advantages and appeal of a skoolie is that you can make and design it exactly how you want it.
No two skoolie floor plans are the same.
How Much Weight Can I Build On My Skoolie?
Every vehicle that operates legally on any U.S. road has a GVWR. GVWR stands for Gross Vehicle Weight Rating.
Every vehicle has a GVWR and it is the maximum amount of weight a loaded vehicle can carry safely. The GVWR is determined by the manufacturer of the vehicle. It includes the weight of the vehicle itself, the passengers, and any cargo or “load” that is placed in or on the vehicle.
The GVWR is a safety rating that eliminates the potential for mechanical failure to the tires, axles, suspension, or safe drivability of the vehicle.
An example would be if your skoolie has a manufacturer’s recommended GVWR of 27,000 pounds. It would be advisable to weigh your skoolie before you begin your build, but after you have removed the seats, walls, ceiling, and floors.
Weigh your skoolie again as you are nearing the completion of your build. This will inform you of how much your skoolie weighs and if you are within the parameters of the manufacturer’s GVWR.
If you are too heavy, then you would want to consider how to lighten your skoolie build so as to be within the acceptable range of the GVWR.
Where Should I Put My Water Tanks?
Having freshwater is one of life’s essential requirements. Being able to have a fresh drink of water while boondocking or camping in a remote location is as important as having fresh air itself.
Sure, you can purchase bottled water and store it somewhere on your bus, but having a fresh supply of on-demand water makes skoolie life more like home.
When planning your skoolie floor plan, knowing how big your freshwater tank is going to be will help determine where you are going to place it.
*Skoolie Build Tip
We recommend that your freshwater tank be stored on the inside or interior of your bus. This eliminates the possibility of your freshwater tank becoming contaminated from outside sources.
It also prevents the possibility of your freshwater tank water freezing while traveling in freezing weather.
Knowing how large your water tank is will determine where you are able to place it, or more appropriately, hide it.
A very popular place to store the freshwater tank is either under the bed, sofa, or kitchen cabinet.
Wherever you decide to place your freshwater tank, be sure that you are able to access it easily to fill it up or do an emergency drain should you need to do so.
Strategically placing the water tank where you can easily and quickly access it will make skoolie life much more enjoyable for you!
Is Propane Safe In The Interior?
Using propane in your skoolie is a debate that has been discussed and argued around many campfires across the globe.
Some people claim it is a suicide mission to have propane inside of your skoolie. Even when mounting the tanks on the outside of the bus.
Others, ourselves included, have been using propane in their skoolie for years and have never had the slightest of issues.
If you choose to use propane as a cooking or heating source for your skoolie, be sure to follow all recommended safety protocols by the appliance manufacturer.
Be wise enough to heed the advice and warnings of other skoolie owners and learn from their mistakes.
When considering and planning on where to place your propane when designing your skoolie floor plan, there are some important factors to consider.
A couple of tips from us based on our own personal experience.
*Disclaimer*
Be aware, that this is not advice and strongly encourage you to do your own research and seek the advice of professionally trained and licensed natural gas professionals before installing or incorporating any propane into your build.
Propane Storage on the Inside of Your Skoolie
If you do choose to use propane in your skoolie and choose to install your propane tank on the interior of your bus, be sure to have a ventilation system in place before running the propane to any of your appliances.
It would be a good idea to install a 12v exhaust fan near the valve of the propane bottle to the outside of your skoolie. Also, cut a hole in the box that is holding your propane bottle as well as the floor of the skoolie to the outside underneath your skoolie floor.
Propane gas is heavier than oxygen, so any gas that escapes will sink to the floor. Better to allow it to sink to the outside of the bus than accumulating on the inside of your skoolie.
Install A Propane Detector
Be sure to install an electronic propane gas alarm detection device. Just as you should install a fire alarm and a CO2 alarm, a natural gas alarm is highly recommended.

Having a natural gas alarm is best mounted close to the floor of your skoolie. This is where the natural gas will sink to and accumulate first.
Propane Tank Underneath Your Skoolie
If you choose propane but do not want a tank on the inside, you may choose to have it mounted underneath your skoolie.
If you choose to mount it underneath, it would be advisable to install a road and debris guard to protect your propane tank from foreign objects that may “kick up” and strike your propane tank.
Can I Insure My Skoolie With A Wood Stove?
We love the sound and smell of a camp stove, campfire or just burning wood itself. Nothing speaks to our senses like a warm glowing fire on a cool winter night.
Having that ambiance and warmth inside of your skoolie takes your skoolie to a whole other level!
We have not done a wood-burning stove in any of our DIY builds. We are putting one in a cabin we are building on some property in Arizona.
We have been to several friends’ skoolies that have incorporated a wood-burning stove in their skoolie. It makes us wish we had one of our own every time!
There are some specific building requirements to do this safely, otherwise, it could be catastrophic.
The potential fire from a wood-burning stove, insurance underwriters will automatically disqualify your skoolie from any type of coverage.
Your wood-burning stove may have every fire prevention safety protocol in place. It may have even been professionally installed. (I don't think you will find anyone licensed or bonded that will install a wood-burning stove in a skoolie.).
The insurance underwriters will still deny any type of coverage for that vehicle.
If you want that warm cozy little stove, it comes with a price. You are going to be hard-pressed to find insurance to cover you.
*Insurance Tip*
Never knowingly and willfully deceive your insurance agent or company on any type of exposure or coverage for your skoolie. Insurance misrepresentation and fraud are considered a felony and punishable by fines and jail time in most states.
If you would like more information on skoolie insurance and how to obtain it. For an in-depth look at what coverages are available to you, take a look at this post on Skoolie Insurance.
Can I Add Under Belly Storage To Save Space On The Inside?
The simplest and quickest answer here is, maybe. We are not being coy here, just being honest. It depends on whether or not you have the spare space underneath your skoolie. Not all skoolies are created equally.
For instance, if you have any type of skoolie other than a diesel pusher. Your skoolie will have a muffler pipe as well as a drive shaft down the center of the underside of your bus.
Since the muffler pipe and driveshaft run the length of your bus, you are limited in space underneath.
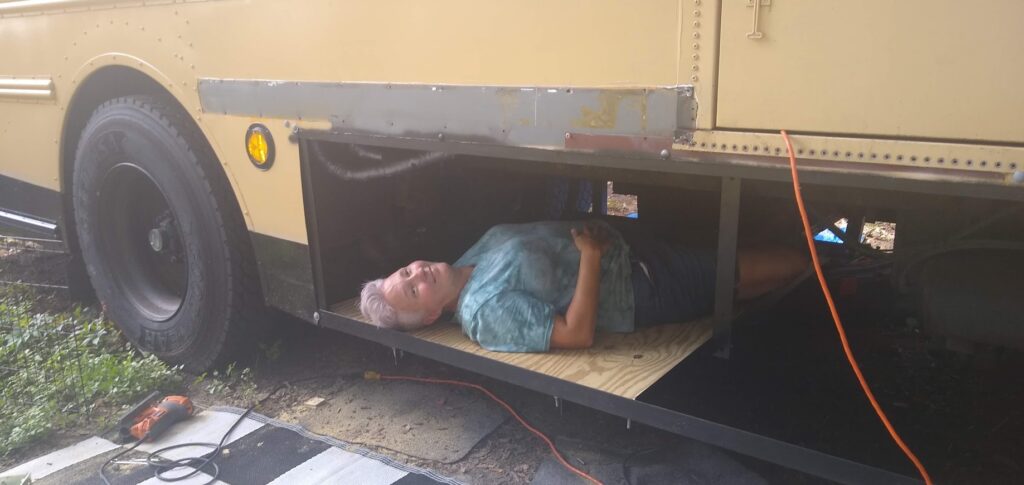
A diesel pusher however has plenty of room between the two-wheel axles. No muffler and no driveshaft. Just empty space.
We built our underbelly storage because we just wanted more space to carry more stuff. What we really didn’t want was to pay for storage space. So, we made use of the space we had available under the bus.
Skoolie Floor Plans Wrap Up
Your skoolie floor plan all comes down to what fits your needs, wants, and personality with your skoolie build.
One of the greatest things about converting a school bus into a motorhome is that there is no cookie-cutter approach to any build. We have never been in two identically built skoolies before.
The difference in energy, style, feng shui, functionality, and personality is as diverse as the skoolie community itself. How you design your skoolie floor plan should all depend on how it feels natural and comfortable for you. Never allow anyone to tell you, “aw, you should have done it like…”
If you would like another take on what makes for a solid Skoolie Floor Plan, take a look at this Skoolie Floor Plan Post. Perhaps you will be able to pick up on something we have not covered in this post.
When you figure your skoolie floor plan out, we would love to hear and see what you have come up with. Leave us a comment and tell us your Instagram or Facebook channel so we can see what you have planned or completed!


Hey guys! love what you are doing on your builds. I recently(not picked up yet) a 2009 Thomas c2 30′ excited to get started with my build. Was wondering what you were doing to address the multiplex system. I’m a long time professional car guy with lots of experience with various systems of this type. Just trying to avoid the hard learning curve.
Thanks in advance for any info you can share and as I dive into this build will be glad to do the same.
Thanks!
Lance
In converting my 2002 International Rear Engine 35′ bus, I am building interior compartments that provide easy access to plumbing and electrical installs. Never know when a problem might occur.
I am more country user for some things like my black and gray water tanks, which are made of heavy duty 55 gallon plastic tanks, at about $15 each as compared to maybe $300 for a commercial bought holding tank. All lighting in my conversion works off the already in place lighting, using retrofit LED lights individually switched ( extra installation ) and the lights draw such minimal current, I can use the bus batteries. I plan on using a VAWT wind generator in place of solar panels, where the VAWT is installed on back bumper when parked at a dispersed camp spot. There is usually lots of wind in high elevations. I will have a flush toilet and a square shower stall with each in its separate space. I will have portable washer and dryer and only use in a campground with water, dump facility and electric. On the front bumper I will have a carriage mounter on two receivers for stability and this area will be for my enclosed propane powered generator to use for microwave and other electrical items requiring 110 AC.
Nothing like having all of the amenities that you have at home. Fully contained and fully comfortable.
A word of disagreement with the author of this website.
Considering the amount of usable floor space between a pusher or a dog nose bus. If the interior area is considered the same in square feet area, the dog nose offers more and better usable space in my view. You only have two wheel wells to deal with. The drive shaft down the center doesn’t take up a lot of space and ends at the rear axle. Past the rear axle you have as much as 10 feet of good space inside and underneath the bus. To each his own though !!